Byzer
Contents
Byzer#
This article demonstrates how to use OpenMLDB and Byzer together to accomplish a complete machine-learning application. In this example, OpenMLDB receives instructions and data sent by Byzer, performs real-time feature computation on the data, and returns the processed dataset through feature engineering to Byzer for subsequent machine learning training and inference.
Preparation#
Install OpenMLDB#
This example recommends using the OpenMLDB cluster version running in a Docker container. For installation steps, please refer to OpenMLDB Quickstart.
In this example, although the Byzer engine is on the same host, it needs to access OpenMLDB services from outside the container. Therefore, the service port of the OpenMLDB cluster needs to be exposed. It is recommended to use the
--network hostmethod, as detailed in the IP Configuration Documentation - CLI/SDK->containeronebox.For simplicity, we use the file format to import and export OpenMLDB cluster data, so Byzer and OpenMLDB need to share the file path. Here, we map
/mlsql/adminto/byzermnt, and use/byzermntas the file path in SQL commands that interact with OpenMLDB.We also need to create a database named
db1in the OpenMLDB cluster, and then use this database in Byzer (currently cannot be executed in Byzer, and Byzer must specify a usable db to connect to OpenMLDB).
The command is as follows:
docker run --network host -dit --name openmldb -v /mlsql/admin/:/byzermnt 4pdosc/openmldb:0.9.2 bash
docker exec -it openmldb bash
/work/init.sh
echo "create database db1;" | /work/openmldb/bin/openmldb --zk_cluster=127.0.0.1:2181 --zk_root_path=/openmldb --role=sql_client
exit # exit container
Install Byzer Engine and Byzer Notebook#
The example uses Byzer All In One Deployment and Byzer Notebook Binary System Installation method to install Byzer component.
Note
If you only need to install the OpenMLDB plugin offline, you can also use the Sandbox Container Deployment, where you can start and install the OpenMLDB plugin offline with just one click.
If you use VSCode, you can also choose the [Byzer Plugin in VSCode] (https://docs.byzer.org/#/byzer-Lang/zh-cn/installation/vscode/byzer-vscode-extension-installation). The plugin includes the built-in Byzer All In One, eliminating the need for manual installation.
For other deployment methods, please refer to the [Byzer Engine Deployment Guidelines] (https://docs.byzer.org/#/byzer-Lang/zh-cn/installation/README).
Install Byzer All In One
wget https://download.byzer.org/byzer/2.3.0/byzer-lang-all-in-one-linux-amd64-3.1.1-2.3.0.tar.gz
tar -zxvf byzer-lang-all-in-one-linux-amd64-3.1.1-2.3.0.tar.gz
cd byzer-lang-all-in-one-linux-amd64-3.1.1-2.3.0
# If you have a Java (jdk8 or higher) environment, you can skip two steps to export
export JAVA_HOME=$(pwd)/jdk8
export PATH=$JAVA_HOME/bin:$PATH
./bin/byzer.sh start
You can visit http://<ip>:9003/.
Install Byzer Notebook. As Byzer Notebook Requires mysql, if you do not have a MySQL engine, you can start one through Docker mode.
docker run -d --name mysql -e MYSQL_ROOT_PASSWORD=root -e MYSQL_ROOT_HOST=% -p 3306:3306 byzer/mysql:8.0-20.04_beta
wget https://download.byzer.org/byzer-notebook/1.2.3/Byzer-Notebook-1.2.3.tar.gz
tar -zxvf Byzer-Notebook-1.2.3.tar.gz
cd Byzer-Notebook-1.2.3
./bin/bootstrap.sh start
You can visit http://<ip>:9002/. The user id and password are admin/admin. The webpage is shown below. This article uses Byzer Notebook for demonstration.

Byzer OpenMLDB Plugin#
This example requires the use of the OpenMLDB Plugin provided by Byzer to accomplish message delivery with OpenMLDB. We can install it in Byzer Notebook, create a Notebook, add Cells, and execute the following commands:
!plugin app add - "byzer-openmldb-3.0";
After running Cell, the plugin will be downloaded and installed. The process will take some time.
Note
If the installation is not successful or the download is too slow, you can manually download the jar package and then go offline (https://docs.byzer.org/#/byzer-lang/zh-cn/extension/installation/offline_install) for installation and configuration.
Prepare Dataset#
This article utilizes the Kaggle taxi driving time dataset. For the sake of demonstration, we will only use a portion of the data, which can be downloaded from here and then uploaded to Byzer Notebook.
After uploading, you can find it in the Data Catalog-File System of the Byzer Notebook.
Note
If you prefer to use the full dataset, you can obtain it from the following website: Kaggle Taxi Driving Time Prediction Problem. After downloading the dataset locally, it needs to be imported into Byzer Notebook.
Machine Learning Process#
By creating a Notebook in Byzer Notebook, you can start writing the entire machine learning process.
Step 1: Check Dataset#
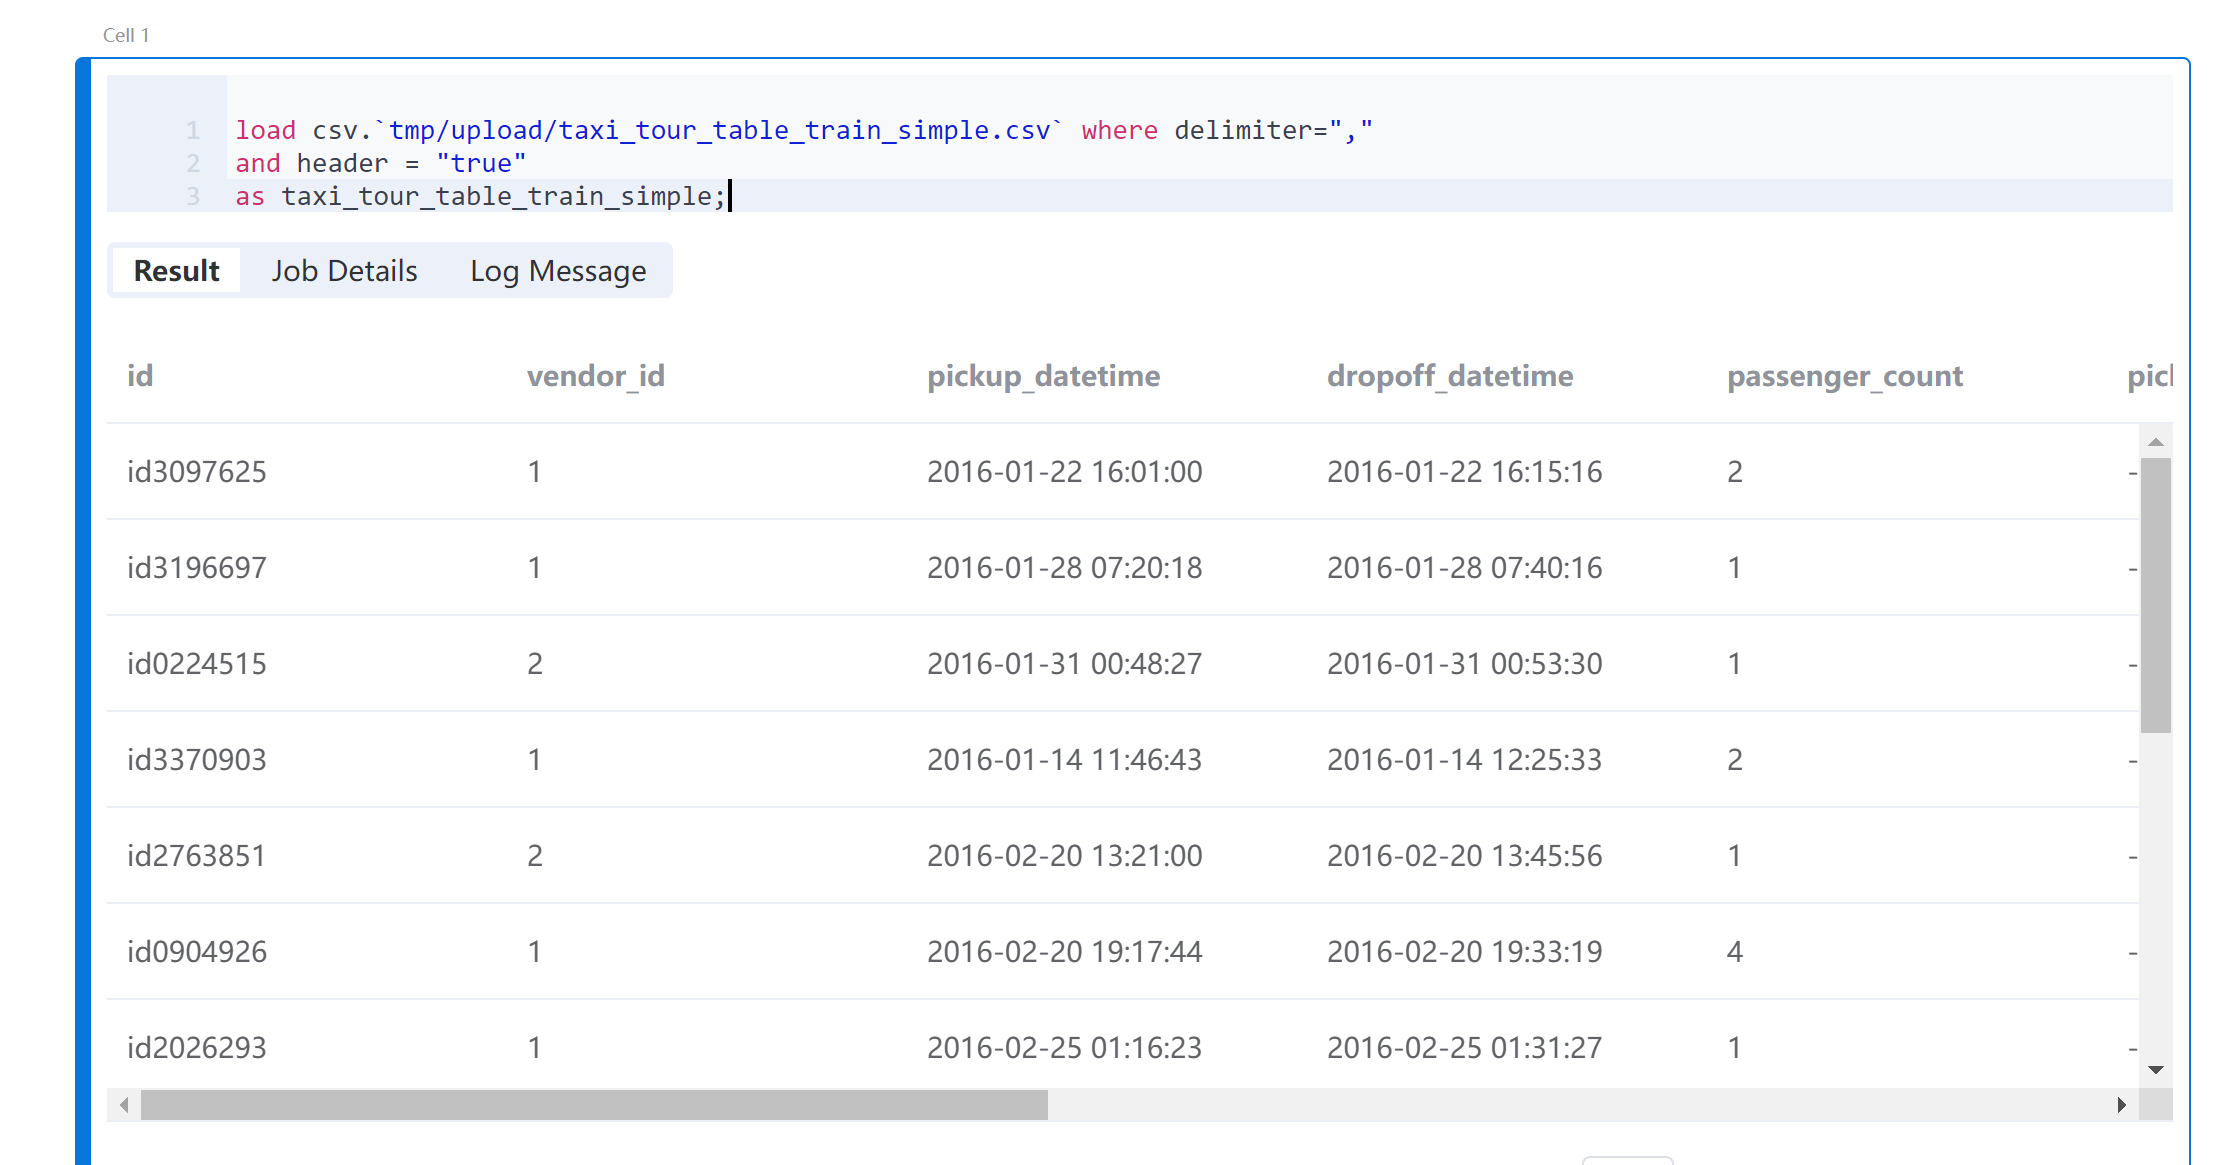
Prepare Dataset has been imported into the File System with the path tmp/upload. Use the Byzer Lang load command to load the data.
load csv.`tmp/upload/taxi_tour_table_train_simple.csv` where delimiter=","
and header = "true"
as taxi_tour_table_train_simple;
After running Cell, you can see the browsing result of the data.
Step 2: OpenMLDB Create Tables and Import Data#
To connect to the OpenMLDB engine, we will use plugins. Since the OpenMLDB cluster and Byzer are deployed on the same host, we can access OpenMLDB using the local address 127.0.0.1:2181. Before running this code block in Byzer Notebook, make sure that the OpenMLDB engine is started.
run command as FeatureStoreExt.`` where
zkAddress="127.0.0.1:2181"
and zkPath="/openmldb"
and `sql-0`='''
SET @@execute_mode='offline';
'''
and `sql-1`='''
SET @@sync_job=true;
'''
and `sql-2`='''
SET @@job_timeout=20000000;
'''
and `sql-3`='''
CREATE TABLE IF NOT EXISTS t1(id string, vendor_id int, pickup_datetime timestamp, dropoff_datetime timestamp, passenger_count int, pickup_longitude double, pickup_latitude double, dropoff_longitude double, dropoff_latitude double, store_and_fwd_flag string, trip_duration int);
'''
and `sql-4`='''
LOAD DATA INFILE '/byzermnt/tmp/upload/taxi_tour_table_train_simple.csv'
INTO TABLE t1 options(format='csv',header=true,mode='overwrite');
'''
and db="db1"
and action="ddl";
After the task is completed, the Result should have a prompt of FINISHED. Please enter the openmldb container to check the job log if it is FAILED.
Step 3: Perform Offline Feature Computation#
Usually, this step involves feature design. However, in this example, we will skip the design phase and directly use the features designed in OpenMLDB + LightGBM: Taxi Travel Time Prediction for offline feature computation. The processed dataset will be exported as a local parquet file (parquet format is recommended; CSV load requires additional schema).
run command as FeatureStoreExt.`` where
zkAddress="127.0.0.1:2181"
and zkPath="/openmldb"
and `sql-0`='''
SET @@execute_mode='offline';
'''
and `sql-1`='''
SET @@sync_job=true;
'''
and `sql-2`='''
SET @@job_timeout=20000000;
'''
and `sql-3`='''
SELECT trip_duration, passenger_count,
sum(pickup_latitude) OVER w AS vendor_sum_pl,
max(pickup_latitude) OVER w AS vendor_max_pl,
min(pickup_latitude) OVER w AS vendor_min_pl,
avg(pickup_latitude) OVER w AS vendor_avg_pl,
sum(pickup_latitude) OVER w2 AS pc_sum_pl,
max(pickup_latitude) OVER w2 AS pc_max_pl,
min(pickup_latitude) OVER w2 AS pc_min_pl,
avg(pickup_latitude) OVER w2 AS pc_avg_pl ,
count(vendor_id) OVER w2 AS pc_cnt,
count(vendor_id) OVER w AS vendor_cnt
FROM t1
WINDOW w AS (PARTITION BY vendor_id ORDER BY pickup_datetime ROWS_RANGE BETWEEN 1d PRECEDING AND CURRENT ROW),
w2 AS (PARTITION BY passenger_count ORDER BY pickup_datetime ROWS_RANGE BETWEEN 1d PRECEDING AND CURRENT ROW) INTO OUTFILE '/byzermnt/tmp/feature_data' OPTIONS(mode='overwrite', format='parquet');
'''
and db="db1"
and action="ddl";
After the task is completed, the Result should show a prompt of FINISHED. If it shows FAILED, please enter the openmldb container to check the job log. Refresh the Data Catalog of the Byzer Notebook to see the generated feature file path and the tmp/feature_data in the File System.
Step 4: Load Data in Byzer#
Load the feature data generated in the previous step into the Byzer environment:
load parquet.`tmp/feature_data` as feature_data;
Convert all int-type fields to double.
select *,
cast(passenger_count as double) as passenger_count_d,
cast(pc_cnt as double) as pc_cnt_d,
cast(vendor_cnt as double) as vendor_cnt_d
from feature_data
as new_feature_data;
Then merge all the fields into one vector.
select vec_dense(array(
passenger_count_d,
vendor_sum_pl,
vendor_max_pl,
vendor_min_pl,
vendor_avg_pl,
pc_sum_pl,
pc_max_pl,
pc_min_pl,
pc_avg_pl,
pc_cnt_d,
vendor_cnt
)) as features,cast(trip_duration as double) as label
from new_feature_data
as training_table;
Step 5: Model Training#
Use the train command with the Built-In Linear Regression Algorithm to train the model and save it to the specified path /model/taxi-trip.
train training_table as LinearRegression.`/model/taxi-trip` where
keepVersion="true"
and evaluateTable="training_table"
and `fitParam.0.labelCol`="label"
and `fitParam.0.featuresCol`= "features"
and `fitParam.0.maxIter`="50";
Note
View the relevant parameters of Byzer’s Built-In Linear Regression Model using the command !show et/params/LinearRegression;.
Step 6: Feature Deployment#
Use DEPLOY (must be in online mode) to deploy the feature computation SQL to OpenMLDB. The SQL should be consistent with the offline feature calculation SQL and it will be named as d1 for deployment.
Note
Note: The deployment name for `DEPLOY must be unique. If you want to change the deployment after it has been successful, you will need to change the deployment name or delete the existing deployment d1 before re-deploying.
run command as FeatureStoreExt.`` where
zkAddress="127.0.0.1:2181"
and zkPath="/openmldb"
and `sql-0`='''
SET @@execute_mode='online';
'''
and `sql-1`='''
DEPLOY d1 SELECT trip_duration, passenger_count,
sum(pickup_latitude) OVER w AS vendor_sum_pl,
max(pickup_latitude) OVER w AS vendor_max_pl,
min(pickup_latitude) OVER w AS vendor_min_pl,
avg(pickup_latitude) OVER w AS vendor_avg_pl,
sum(pickup_latitude) OVER w2 AS pc_sum_pl,
max(pickup_latitude) OVER w2 AS pc_max_pl,
min(pickup_latitude) OVER w2 AS pc_min_pl,
avg(pickup_latitude) OVER w2 AS pc_avg_pl ,
count(vendor_id) OVER w2 AS pc_cnt,
count(vendor_id) OVER w AS vendor_cnt
FROM t1
WINDOW w AS (PARTITION BY vendor_id ORDER BY pickup_datetime ROWS_RANGE BETWEEN 1d PRECEDING AND CURRENT ROW),
w2 AS (PARTITION BY passenger_count ORDER BY pickup_datetime ROWS_RANGE BETWEEN 1d PRECEDING AND CURRENT ROW);
'''
and db="db1"
and action="ddl";
Step 7: Import Online Data#
Online real-time prediction often involves importing recent historical data into online storage. In addition to importing data files, real-time data sources can also be accessed in the production environment. For simplicity, this example directly imports the original dataset (real-time prediction uses new real-time data as a request, so there will be no “feature data for prediction training”).
run command as FeatureStoreExt.`` where
zkAddress="127.0.0.1:2181"
and zkPath="/openmldb"
and `sql-0`='''
SET @@execute_mode='online';
'''
and `sql-1`='''
SET @@sync_job=true;
'''
and `sql-2`='''
SET @@job_timeout=20000000;
'''
and `sql-3`='''
LOAD DATA INFILE '/byzermnt/tmp/upload/taxi_tour_table_train_simple.csv'
INTO TABLE t1 options(format='csv',mode='append');
'''
and db="db1"
and action="ddl";
Step 8: Model Deployment#
Register the previously saved and trained model as a function that can be used directly.
register LinearRegression.`/model/taxi-trip` as taxi_trip_model_predict;
Step 9: Real-Time Predictive Testing#
Typically, real-time feature prediction is driven by real-time data. For the convenience of this demonstration, we will still perform “real-time feature computation + prediction” in the Notebook. We will use the Python Environment for real-time feature computation by using the requirements file.
pyarrow==4.0.1
ray[default]==1.8.0
aiohttp==3.7.4
pandas>=1.0.5; python_version < '3.7'
pandas>=1.2.0; python_version >= '3.7'
requests
matplotlib~=3.3.4
uuid~=1.30
pyjava
protobuf==3.20.0 # New, if the protobuf version is too high, there will be import ray errors
pip install -r requirements.txt
We will construct “real-time data” and request OpenMLDB to compute real-time features using HTTP. The computed features will be saved as a file and then loaded into the Byzer environment.
!python env "PYTHON_ENV=:";
!python conf "runIn=driver";
!python conf "schema=file";
run command as Ray.`` where
inputTable="command"
and outputTable="test_feature"
and code='''
import numpy as np
import os
import pandas as pd
import ray
import requests
import json
from pyjava.api.mlsql import RayContext,PythonContext

ray_context = RayContext.connect(globals(),None)

resp = requests.post('http://127.0.0.1:9080/dbs/db1/deployments/d1', json=json.loads('{"input":[["id0376262", 1, 1467302350000, 1467304896000, 2, -73.873093, 40.774097, -73.926704, 40.856739, "N", 1]], "need_schema":true}'))

res = json.loads(resp.text)["data"]
schema_names = [(col["name"], col["type"]) for col in res["schema"]]
df = pd.DataFrame.from_records(np.array([tuple(res["data"][0])], dtype=schema_names))
df.to_parquet('/mlsql/admin/tmp/test_feature.parquet')

context.build_result([])
''';
Convert all int-type fields of the processed online data to double.
select *,
cast(passenger_count as double) as passenger_count_d,
cast(pc_cnt as double) as pc_cnt_d,
cast(vendor_cnt as double) as vendor_cnt_d
from feature_data_test
as new_feature_data_test;
Then perform vectorization.
select vec_dense(array(
passenger_count_d,
vendor_sum_pl,
vendor_max_pl,
vendor_min_pl,
vendor_avg_pl,
pc_sum_pl,
pc_max_pl,
pc_min_pl,
pc_avg_pl,
pc_cnt_d,
vendor_cnt
)) as features
from new_feature_data_test
as testing_table;
Using the processed test set for prediction, the result is the predicted trip_duration.
select taxi_trip_model_predict(testing_table) as predict_label;